
Register and Refine
Agent Registration Guide
Register an intent classification agent in GGX by connecting a model and prompt, configuring agent metadata, adding resources, and testing outputs.
An agent combines multiple resources (models, prompts, RAGs, helper functions) to create an end-to-end use-case specific workflow. Read more about Agents to understand more about what they are and how they work. This guide covers how to register agents on the GGX, using an Intent Classification Agent as a working example.
Prerequisites
Section titled “Prerequisites”Before registering an agent, ensure you have:
-
✅ Registered a Model - Follow the Model Registration Guide to register Gemini 2.0 Flash
-
✅ Registered a Prompt - Follow the Prompt Registration Guide to register the intent classification prompt
Quick Check: Navigate to Data & AI Assets → Models and Skills / Prompts to verify your resources are available.
If you haven’t completed these steps, please do so before proceeding.
Registration Steps
Section titled “Registration Steps”Step 1. Navigate to Agents
Section titled “Step 1. Navigate to Agents”Go to Data & AI Assets → Agents and click the Create button.
Step 2. Fill in Basic Information
Section titled “Step 2. Fill in Basic Information”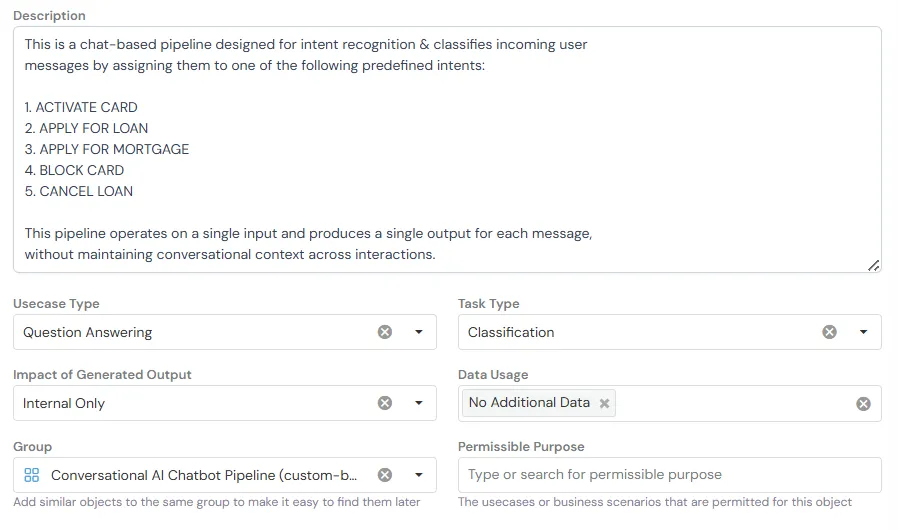
Basic Information fields help organize and identify your agent:
- Description: Clear explanation of what the agent does and its workflow
- Usecase Type: The primary use case category (e.g., “Question Answering”)
- Task Type: Specific task the agent performs (e.g., “Classification”)
- Impact of Generated Output: Scope of the agent’s usage (e.g., “Internal Only”)
- Data Usage: Whether the agent uses additional data sources beyond user input
- Group: Category for organizing similar agents (e.g., “Conversational AI ChatBot Agent”)
- Permissible Purpose: Approved use cases and business scenarios for this agent
Example for Intent Classification Agent:
This is a chat-based pipeline designed for intent recognition & classifies incoming usermessages by assigning them to one of the following predefined intents:
1. ACTIVATE CARD2. APPLY FOR LOAN3. APPLY FOR MORTGAGE4. BLOCK CARD5. CANCEL LOAN
This pipeline operates on a single input and produces a single output for each message,without maintaining conversational context across interactions.
Step 3. Configure Code Settings
Section titled “Step 3. Configure Code Settings”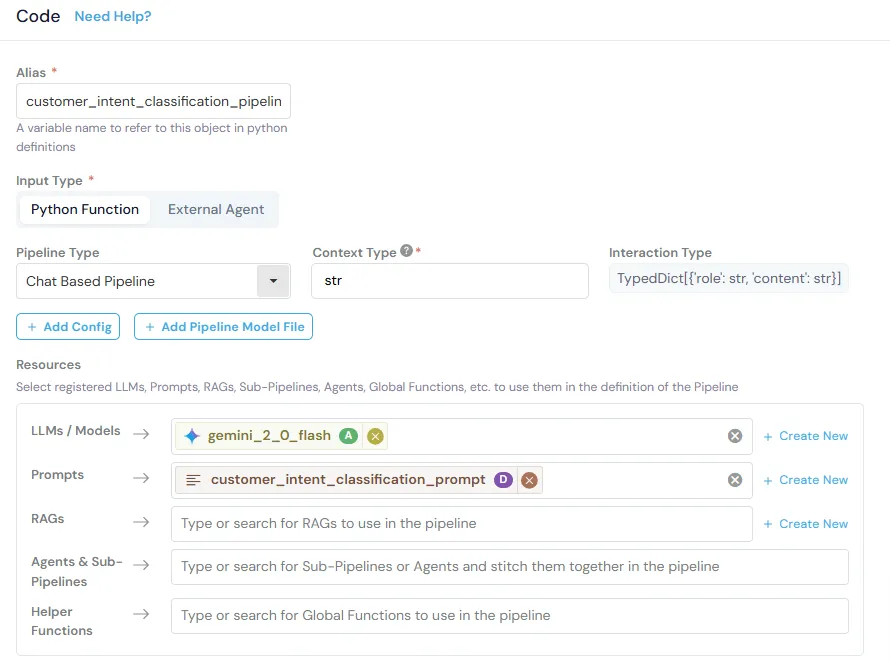
Code Settings define how your agent operates and which resources it uses.
Fill in the Basic Information fields as shown in the image above. These includes Alias, Input Type, Agent Type, and Context Type.
NOTE: For this case we have chosen to create a chat-based agent as in future we can expand the agent to recognize the user’s intent over multiple turns, though for now we are keeping it simple and using a single input/output.
Step 4. Add Resources
Section titled “Step 4. Add Resources”Resources are the pre-registered components your agent will use.
Click + Create New or search for existing resources to add:
LLMs / Models:
gemini_2_0_flash- The foundation model for generating responses
Prompts:
customer_intent_classification_prompt- The structured instructions for intent classification
Other Resources (Not required for this example):
- RAGs: For retrieving relevant documents
- Agents & Sub-Agents: For complex multi-step workflows
- Helper Functions: For data processing utilities, or any other function according to your requirement
Step 5. Write Agent Scoring Logic
Section titled “Step 5. Write Agent Scoring Logic”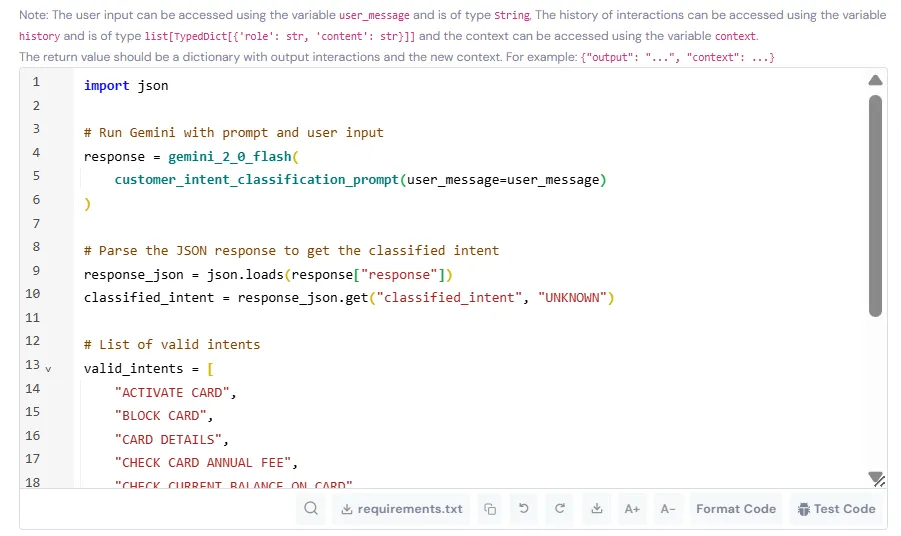
Agent Scoring Logic orchestrates how resources work together:
- Combines models, prompts, and other resources
- Processes user inputs and conversation history
- Generates outputs and maintains context across turns
Example - Intent Classification Agent:
import json
# Run Gemini with prompt and user inputresponse = gemini_2_0_flash(    customer_intent_classification_prompt(user_message=user_message))
# Parse the JSON response to get the classified intentresponse_json = json.loads(response["response"])classified_intent = response_json.get("classified_intent", "UNKNOWN")
# List of valid intentsvalid_intents = [    "ACTIVATE CARD",    "BLOCK CARD",    "CARD DETAILS",    "CHECK CARD ANNUAL FEE",    "CHECK CURRENT BALANCE ON CARD",]
# Validate the classified intentif classified_intent not in valid_intents:    classified_intent = "UNKNOWN"
# Return output and contextreturn {    "output":  classified_intent,    "context": "Any information that needs to be stored across turns"}
What This Does:
- Calls the Gemini model with the classification prompt and user message.
- Parses the JSON response to extract the classified intent.
- Validates the intent against the list of valid intents.
- Returns the classification result as the output and any information that needs to be stored across turns as the context.
Variables Available:
user_message- The current user input (type: String)history- Previous conversation messages (type: list[TypedDict[{‘role’: str, ‘content’: str}]])context- Any information that needs to be stored across turns (type: String)
Step 6. Add Examples (Optional)
Section titled “Step 6. Add Examples (Optional)”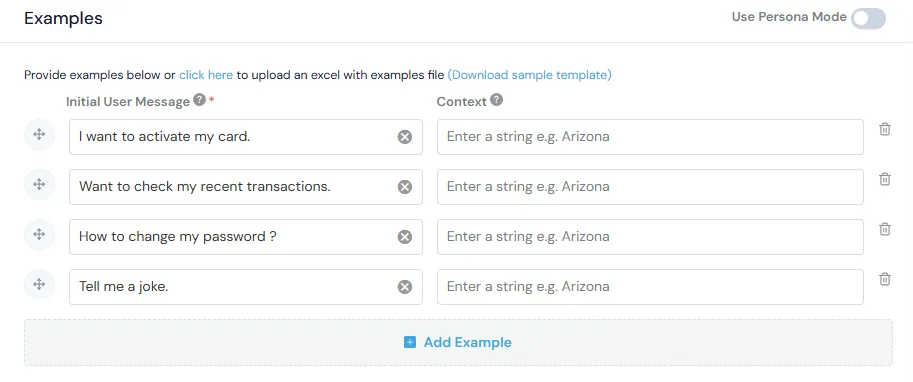
Add test examples to validate agent behavior.
Note: Examples help with testing and documenting expected behavior.
Step 7. Save the Agent
Section titled “Step 7. Save the Agent”Click Create to register the agent.
The agent is now:
- Available under Data & AI Assets → Agents
- Ready for simulation and testing
- Ready for use in downstream applications
Testing Your Agent
Section titled “Testing Your Agent”After creating the agent, test it to verify behavior:
Quick Test (During Creation/Editing)
Section titled “Quick Test (During Creation/Editing)”- While creating or editing the agent, scroll to the Code section
- Click Test Code in the bottom right corner
- Enter test inputs to verify logic without saving
Interactive Test (After Saving)
Section titled “Interactive Test (After Saving)”-
Navigate to your saved agent
-
Click Run → Chat Session (top right corner)
NOTE: Chat sessions is only available for chat-based agents. For free-flow agents, you can test the agent by calling the agent function with sample inputs using the test code button.
-
Enter sample messages to test the full conversation flow
-
Verify outputs match expected behavior
Using Agents
Section titled “Using Agents”In Applications
Section titled “In Applications”Reference the agent in your application code:
# Call the pipelineresult = customer_intent_classification_pipeline(    user_message="I want to block my card",    history=[],    context="")
# Access the outputclassified_intent = result["output"]  # "BLOCK CARD"context = result["context"]  # "Any information that needs to be stored across turns"
Related Documentation
Section titled “Related Documentation”- Model Registration Guide - Register foundation models
- Prompt Registration Guide - Create reusable prompts
By following this guide, you can create reliable, production-ready agents that combine multiple AI resources into cohesive workflows.